GitHouse from First Visit to First Pull Request
Find code, activate GitHouse, fork a repository, and use Git to propose your first change.
GitHouse is where CLI-Games players keep code, find other people's projects, and work together. This walkthrough takes you from browsing a repository to opening a pull request, a proposal asking its owner to merge your changes.
You will make a small documentation improvement to live-helpers, the repository containing Backspin's auto-plunger and Hairpin's automatic gears. You can follow the same steps for another public repository that welcomes contributions. The example account in the pictures is pilot; use your own GitHouse username.
Use the CLI-Games terminal for the commands below, and keep this guide open in another tab. Enter commands one line at a time. The clone addresses are for the site's terminal; browse repositories through GitHouse.
1 Browse before signing up
Open GitHouse and search for live-helpers. Open cli-games/live-helpers, then read its README, open files, and expand Commit history to see how the project changed. Read its license before reusing or contributing code.
Anyone can browse, clone, edit and make local commits. Publishing a branch or a pull request requires an activated contributor account.
A few names describe where your work lives:
| Name | What it means |
|---|---|
| Repository | A project's files and Git history. |
| Fork | Your copy of a repository on GitHouse. |
| Clone | A working copy in your terminal, where you edit files. |
| Branch | A named line of work, so one change stays separate from main. |
| Commit | A recorded change with an author and message. |
| Pull request or PR | A proposal to merge your branch into another repository. |
2 Sign in and activate GitHouse
If you already have a CLI-Games account, type signin in the terminal and follow the prompts. Otherwise type:
signup
Follow the account prompts. Verify your email with confirm followed by the six-digit code from your message. If you are already signed in with a verified email, continue directly to GitHouse.
Open GitHouse again. GitHouse username starts with your CLI-Games username in lowercase. Keep it if it is available and accepted. Both belong to the same CLI-Games login; the GitHouse name becomes the owner part of repository addresses such as pilot/live-helpers. If the name is unavailable or fails the displayed naming rules, choose another before activating.
Read the contributor rules. Publishing requires you to be 13 or older, accept those rules, and have a verified email. Check I am 13 or older and accept these contributor rules, then select Activate GitHouse. The page updates while activation completes. No invitation is needed.
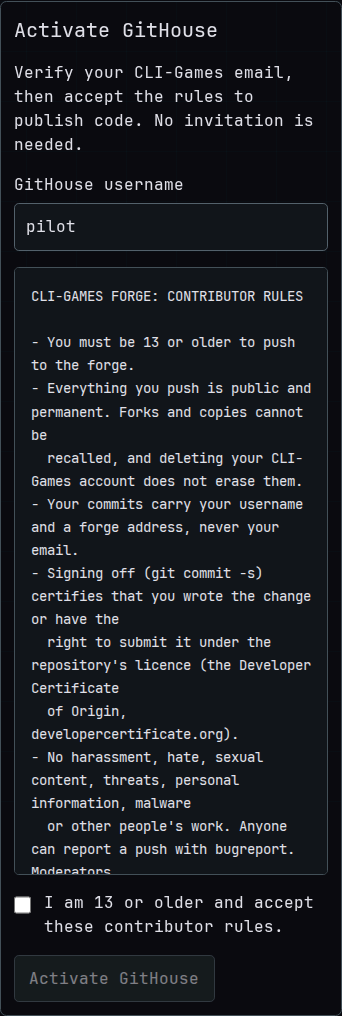
Everything you push is public. Copies and forks can remain after you delete your account, so keep passwords and personal information out of files and commit messages.
When GitHouse says your contributor account is active, expand Git identity for signed-off commits. Copy the two git config --global commands shown there into your terminal before making your contribution commit. They set your GitHouse username and the supplied forge email address. Use that supplied address instead of your personal email.
3 Fork the project and clone your fork
Return to cli-games/live-helpers and select Fork. GitHouse opens your copy, with your username at the top and a Forked from cli-games/live-helpers link. If you already have this fork, open it through Your profile instead.
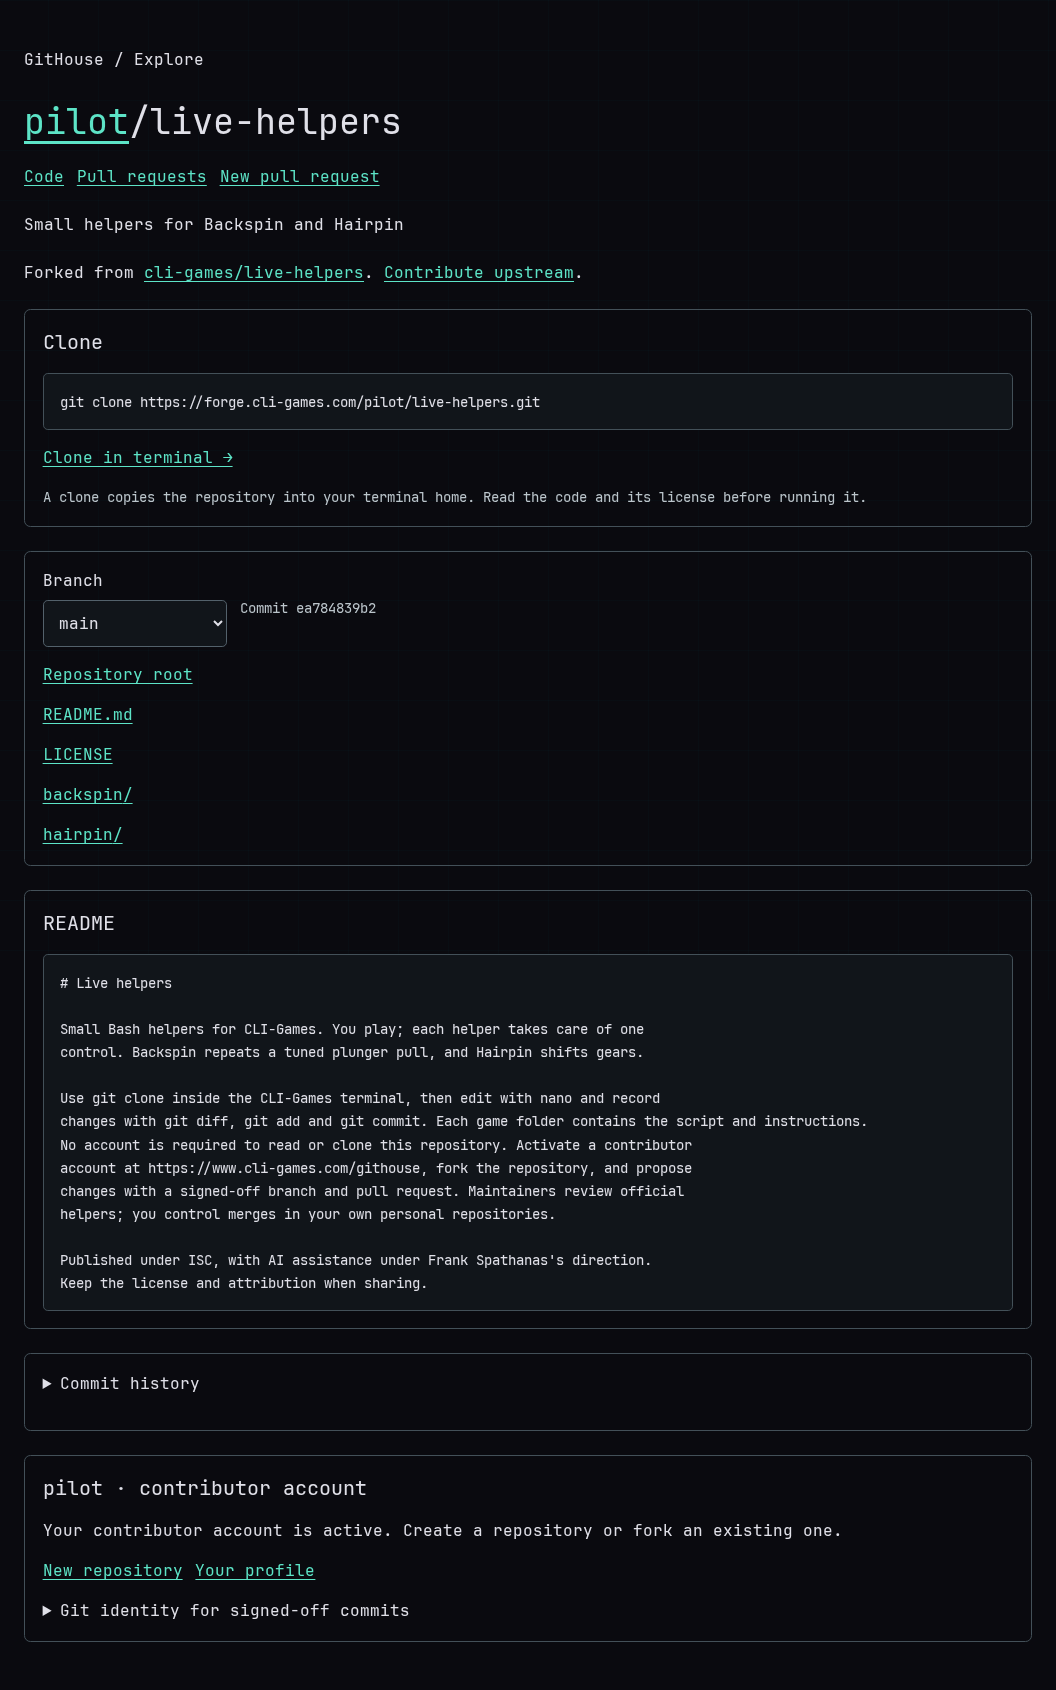
In these commands, replace YOU with the GitHouse username shown on your fork:
git clone https://forge.cli-games.com/YOU/live-helpers.git ~/first-pr
cd ~/first-pr
git remote -v
git switch -c clarify-readme
origin is Git's default name for the repository you cloned: your fork. clarify-readme is the new branch for this contribution. The local directory name first-pr does not rename the repository on GitHouse.
Use a fresh directory for this walkthrough. If ~/first-pr already exists, Git will refuse to replace it; choose another unused directory and use that same path in cd. If you are resuming this exact walkthrough, use your existing clone and git switch clarify-readme instead.
4 Make one useful edit
Open the README:
nano README.md
Find one instruction that could be clearer. For example, if the README does not yet explain that cloning never starts a helper, add this sentence beside the clone instructions:
Cloning copies the files; it does not start a helper or launch a game.
If that clarification is already there, choose a different improvement you actually needed. A useful first contribution can be a corrected typo or a clearer setup instruction. Keep the license and attribution intact.
Save in nano with Ctrl+O, press Enter, then exit with Ctrl+X. Inspect what changed:
git status
git diff
Check that the diff contains only your intended edit. For a documentation change, verify its claim: cloning the repository should leave you at the terminal without starting a helper. For a code change, test its behavior before proposing it. The Backspin and Hairpin guides cover those helpers in play.
5 Commit and push your branch
git add README.md
git diff --cached
git commit -s -m "Clarify that cloning does not start a helper"
git log -1
git status
git push -u origin clarify-readme
Use a commit message describing your actual change. git add stages the saved file; git diff --cached shows exactly what the commit will contain. git commit records it locally. The -s adds a sign-off certifying that you wrote the change or have the right to submit it under the repository's license. It is separate from cryptographically signing a commit.
git push publishes your branch to your fork. The first push's -u remembers that destination, so later updates on this branch can use git push. Committing alone does not publish anything.
Open your fork in GitHouse and select clarify-readme in Branch. Open README.md to check that your change arrived. A push updates your fork; the original repository changes only if its owner merges your contribution.
6 Open the pull request
On your fork, select Contribute upstream, or open New pull request on cli-games/live-helpers.
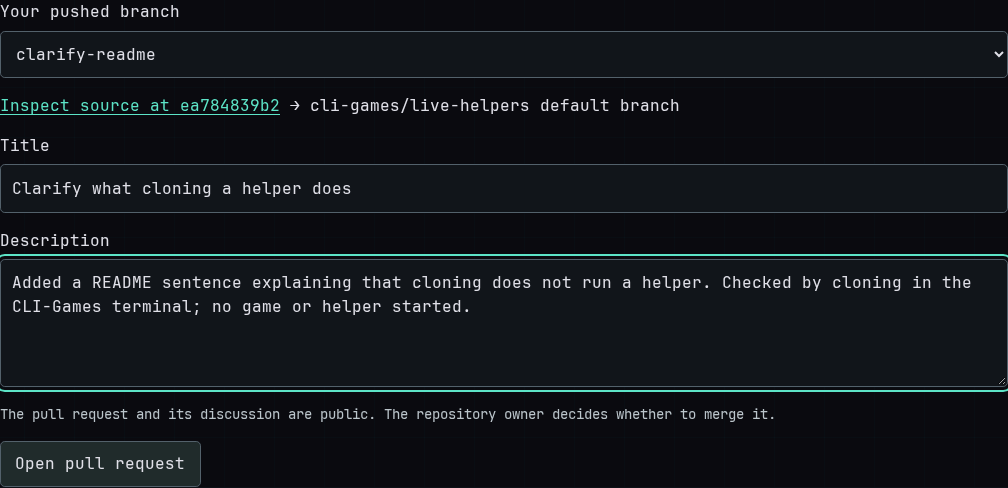
1. In Your pushed branch, select clarify-readme. If it is missing, expand Prepare a branch with Git and choose Refresh pushed branches.
2. Check that the direction is your branch into cli-games/live-helpers' default branch. Use Inspect source to review the exact code you are proposing.
3. Give the PR a short, specific Title, such as Clarify what cloning a helper does.
4. In Description, explain what changed, why it helps, and how you checked it. For this example: Added a README sentence explaining that cloning does not run a helper. Checked by cloning in the CLI-Games terminal; no game or helper started. Only describe checks you actually performed.
5. Select Open pull request.
GitHouse opens a numbered PR page. Check the source and destination near the title, then read Changes. Copy this page's URL when you want to share the proposal.
7 Respond to review
The PR page contains its changes, reviews and discussion. Use Add a review comment to explain a decision or ask for feedback. The comment refers to the revision currently displayed; it does not approve or merge the proposal.
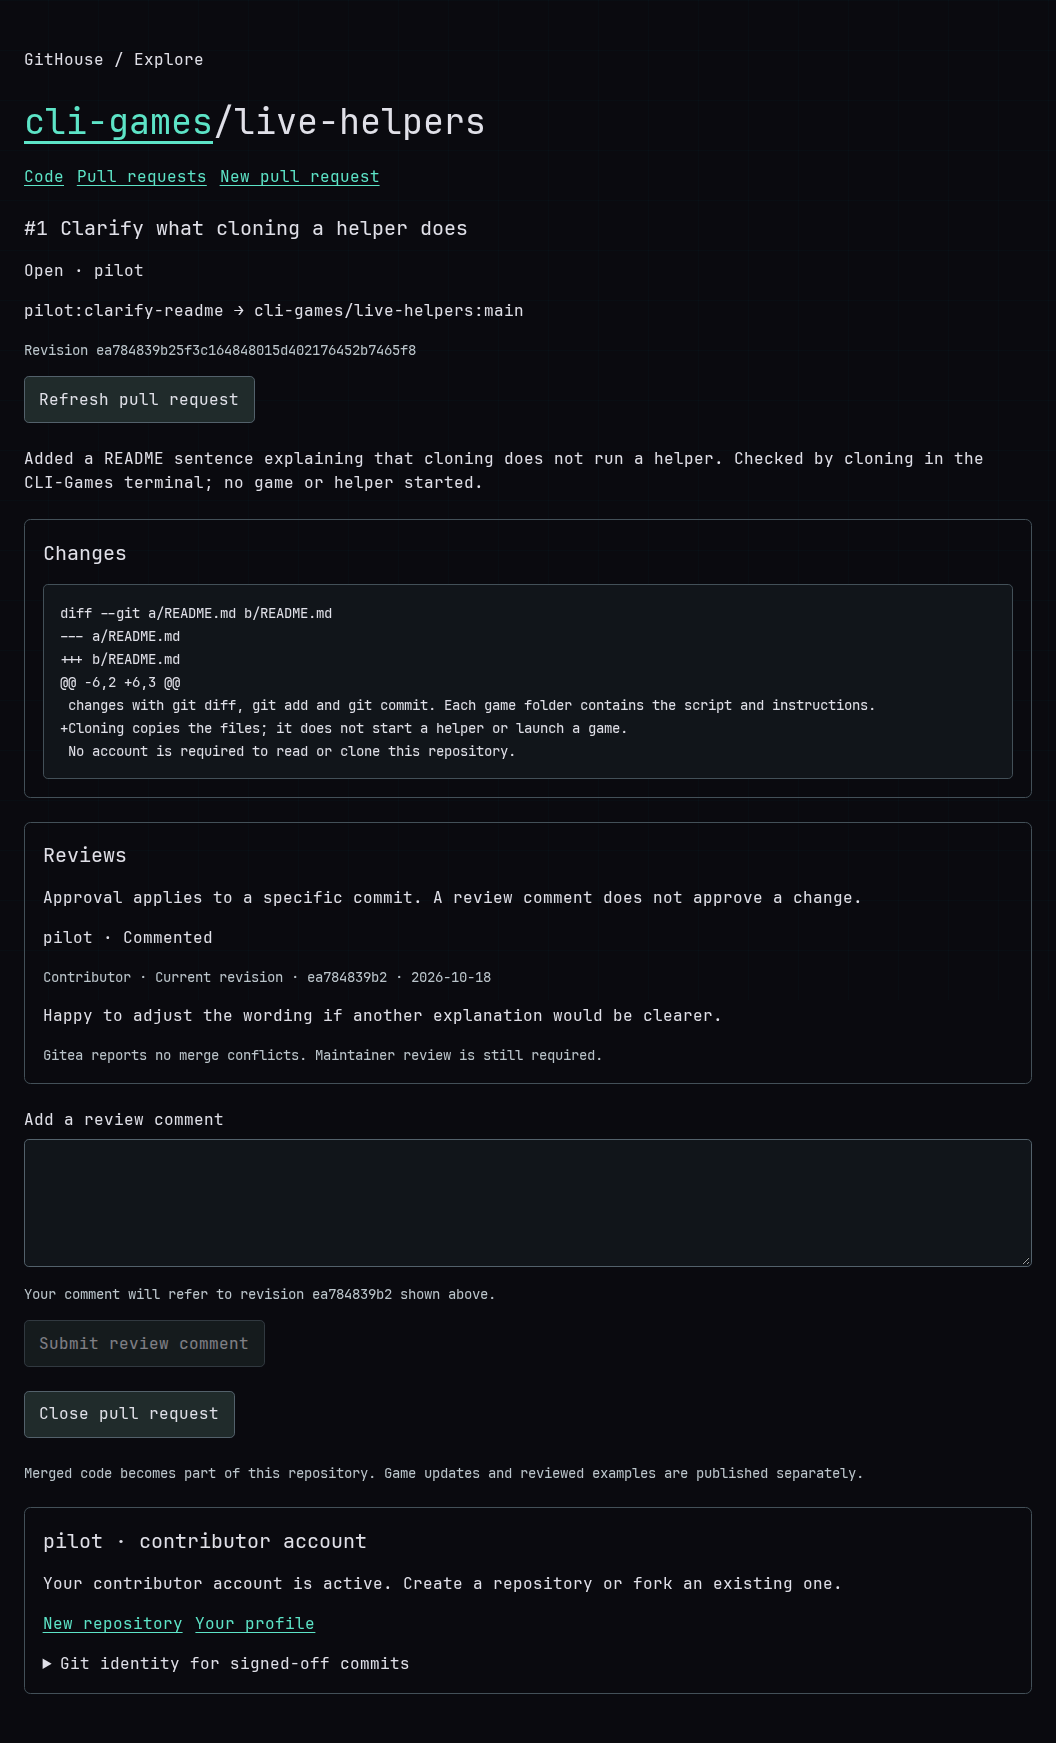
If a reviewer asks for an adjustment, edit the same local branch and make another signed-off commit:
cd ~/first-pr
git switch clarify-readme
nano README.md
git diff
git add README.md
git diff --cached
git commit -s -m "Clarify the wording after review"
git push
Use your actual directory and describe the actual follow-up. Pushing to the same branch updates the open PR. Return to its page and select Refresh pull request to inspect the new revision. Earlier reviews remain identified with the revision they covered.
You can Close pull request if you decide to withdraw it. For official CLI-Games repositories, a maintainer decides whether to merge. For a player's repository, its owner can use Merge pull request when the displayed revision is mergeable. A merged PR adds the change to that repository; publishing a game update or a reviewed example is a separate step.
8 Start a project of your own
You can also open New repository, choose a name and optional description, and select Create repository. The repository starts empty. Clone it, add your first files, make a signed-off commit using your GitHouse identity, then push the branch. The repository page provides its exact address and first-push instructions.
Personal repositories appear on Your profile and in GitHouse's repository search. They accept source code in any language as UTF-8 text, within the limits displayed on the creation page. Hosting a file does not make that language executable inside a game. Other contributors can fork your project and propose changes; you decide what to merge.
If a step fails
| What you see | What to check |
|---|---|
| Fork is disabled | Sign in, verify your email, accept the contributor rules, and wait for activation. An empty repository needs its first commit before it can be forked. |
| Username is rejected | Follow the displayed naming rules or choose an available name before activating. |
| Push rejects the identity or sign-off | Copy your identity commands from GitHouse and use git commit -s for each new contribution commit. If the only new commit is your latest unpushed practice commit, git commit --amend --reset-author -s -m "Clarify README instructions" can correct it after configuring your identity. Use a message describing your actual change. |
| Push says you do not own the destination | Run git remote -v. When following this guide, origin should point to your fork, with your GitHouse username in its address. |
| Push is rejected because the remote changed | Run git fetch origin and inspect the history. Do not force a push over someone else's work. man git explains fetching, merging and conflict resolution. |
| Branch is absent from the PR form | Confirm the push succeeded to the correct fork, then choose Refresh pushed branches. |
| Activation needs attention | Your request is saved. Contact support with your GitHouse username, as the page instructs. |
For command details, type man git in the terminal. For editor and workspace keys, keep the terminal workspace cheat sheet nearby. You can reopen this article with wiki githouse-first-pull-request.